What just shipped
Optimizely quietly dropped something significant: a hosted Model Context Protocol (MCP) server for CMS (SaaS). This means your AI-powered editor — Cursor, Claude Code, VS Code Copilot, or Claude Desktop — can now talk directly to your Optimizely instance. No API scripts, no copy-pasting responses into prompts, no dashboard tab-switching.
You type a natural-language query in your IDE, and the MCP server fetches live data from your CMS and hands it back. That’s the pitch. Let’s dig into what it actually means in practice.
Quick primer: what is MCP?
Model Context Protocol (MCP) is an open standard — originally developed by Anthropic — that gives AI clients a structured way to connect to external tools and data sources. Think of it as a universal adapter between your AI client and any system that implements the protocol.
Without MCP, you’re copying content into prompts or writing glue code to call APIs. With MCP, the AI client has a live, authenticated connection to the system and can call tools directly. The protocol handles the session, the tool schema discovery, and the data transport.
MCP is to AI clients what LSP (Language Server Protocol) was to code editors — a standard that removes the N×M integration problem.
Optimizely’s MCP server is hosted by Optimizely at a single URL. You register it once in your AI client and authenticate via OAuth. No self-hosting, no token management.
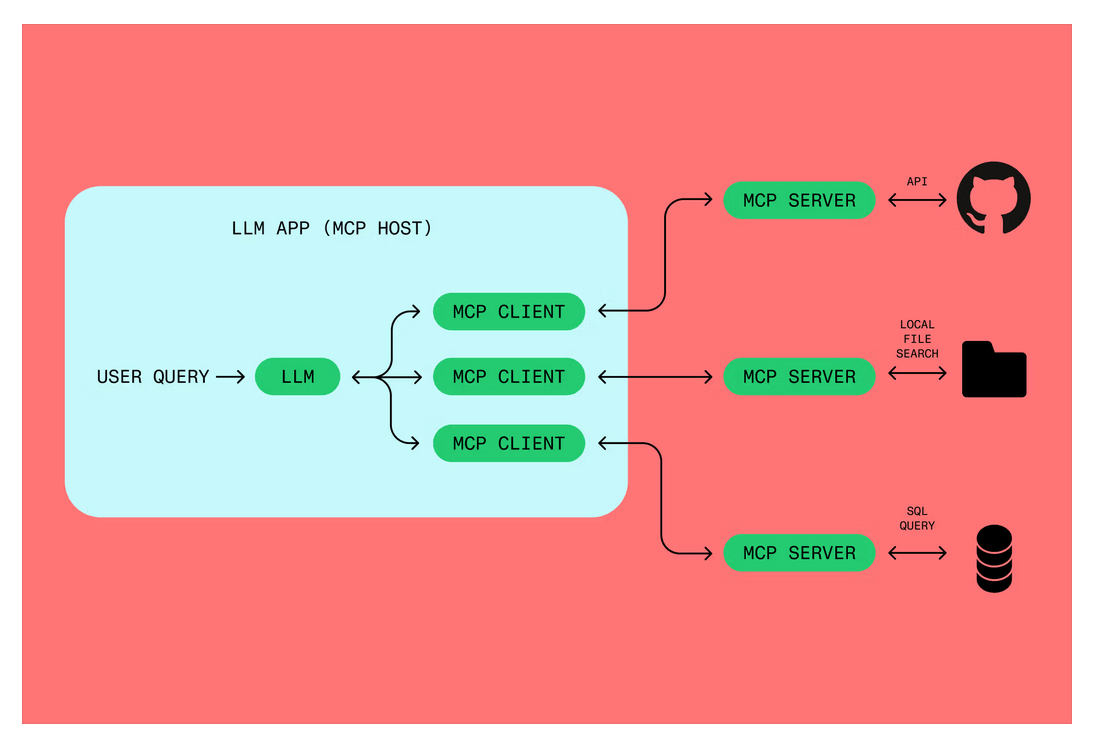
How MCP works : Source : https://www.figma.com/resource-library/what-is-mcp/
Optimizely SaaS — MCP Server Architecture

What the Optimizely SaaS MCP server can do
Once connected, the MCP server exposes a set of tools prefixed with cms_ and graph_. Here’s what you can actually do from inside your editor:
| Use case | Example prompt in your IDE |
|---|---|
| Content type auditing | “What are all the content types updated in the last year?” |
| Content creation | “Create a Hero block content type with these fields…” |
| Front-end scaffolding | “Generate a React component for the BlogPost content type” |
| Developer onboarding | “Complete the initial dev setup for this CMS instance” |
| Preview configuration | “Configure preview for my Next.js app running on localhost:3000” |
| Content migration | “List all content items using the deprecated LegacyHero type” |
The server sees exactly what your Opti ID account has access to — same data, same permissions as the Optimizely UI.
Who it’s for
Developers using AI-powered editors
If you’re working in Cursor, Claude Code, VS Code with Copilot, Windsurf, or Codex, the MCP server lets you complete full implementation workflows without leaving your editor. Define a content type, scaffold the React component, and configure preview — all in one agentic session.
Technical marketers and editors in browser-based AI
If you use Claude Desktop, Claude.ai, or ChatGPT, you can query your CMS instance in plain English for reporting and auditing. No developer needed to pull a content inventory or check what’s been updated.
How to set it up (5 minutes)
The MCP server URL is:
https://cms.mcp.opal.optimizely.com/mcp
Prerequisites
- An Opti ID account (same credentials you use to log into the Optimizely UI)
- An Optimizely account with Opal enabled, connected to at least one CMS (SaaS) instance
- An AI client that supports remote MCP (see table below)
Register the server in your AI client
| AI Client | How to add |
|---|---|
| Claude Code (CLI) | claude mcp add --transport http cms https://cms.mcp.opal.optimizely.com/mcp |
| Claude Desktop | Settings → MCP Servers → Add Server |
| Claude.ai | Settings → Integrations → Add MCP Server |
| Cursor | Settings → MCP → Add new MCP server |
| VS Code + Copilot | Open MCP settings in Copilot configuration |
| Windsurf | Settings → MCP Servers, or edit .windsurf/mcp.json |
| Codex | Settings → MCP servers → Add server |
Authenticate
On first connection, your AI client opens a browser OAuth flow. You:
- Log in with your Opti ID credentials
- Select your Opal instance
- Authorize the MCP connection
That’s it. No manual API token, no credential files. The session is time-limited — when it expires, your client prompts you to re-authenticate.
Test the connection
Run this query in your AI client:
List all of my content types
You should get a real-data response from your CMS instance. If you see tools prefixed with cms_ or graph_ in your client’s tool list, you’re connected.
Demo: see it in action
The walkthrough below shows connecting the MCP server in Cursor, authenticated with Opti ID, and running a live content type query against a real CMS (SaaS) instance.

If the video hasn’t loaded yet, jump straight to the setup steps above.
Under the hood: how the auth flow works
It’s worth understanding the three-layer identity model:
- Opti ID — Optimizely’s unified identity system. Single credentials across all Optimizely products. If you have an Optimizely login, you already have Opti ID.
- Opal — Optimizely’s agent orchestration platform. The MCP server authenticates through your Opal instance, which in turn is connected to one or more CMS (SaaS) instances. Selecting your Opal instance during OAuth automatically wires up all the CMS instances linked to it.
- MCP session — Once authenticated, your AI client holds a time-limited OAuth token. The MCP server uses this to call Optimizely APIs on your behalf, with exactly the same permissions your account has in the UI.
No service account, no static API key sitting in a .env file. That’s a meaningful security improvement over how most CMS integrations work today.
Using it with the JavaScript SDK Skills
The MCP server is designed to work alongside the Optimizely JS SDK skills — a set of agentic skill definitions for the JS SDK. Together, they unlock a more complete development workflow:
- MCP server provides live read/write access to your CMS instance
- SDK skills provide the recipe for common tasks (scaffolding, preview config, content type creation)
For example: you can ask your AI client to “Create a Hero content type and scaffold a React component for it” — the MCP server handles the CMS API calls, the SDK skill handles the component code generation.
Things to be aware of
A few practical notes before you start:
- Opal must be enabled on your account. The MCP server authenticates through Opal, so if Opal isn’t connected to your CMS instance, the auth flow will fail. Check with your Optimizely account admin.
- Session expiry — OAuth sessions are time-limited. When your session expires, your AI client will prompt for re-auth. Plan for this in long-running agentic workflows.
- Permissions are inherited — the MCP server respects your Opti ID RBAC. A read-only editor won’t be able to create content types via MCP even if they try.
- Remote MCP support varies by client — most modern AI editors support it, but double-check your client version. Older versions of Cursor or VS Code Copilot may need an update.
Why this matters for Optimizely SaaS projects
The MCP server isn’t a gimmick — it directly addresses some of the friction points we see on every Optimizely SaaS implementation:
- Content type auditing is tedious in the UI. With MCP, it’s a single natural-language query.
- Front-end scaffolding from content types usually means copying field definitions by hand. Now your AI client can read the content type directly and generate the component.
- Onboarding new developers takes time because they need to learn the CMS UI to understand the content model. MCP lets them ask the system directly.
- Migration planning — finding all content using a deprecated type, or auditing what’s changed — becomes a conversation rather than a dashboard report.
Get started
- Check that Opal is enabled on your Optimizely account
- Open your AI client and register the MCP server:
https://cms.mcp.opal.optimizely.com/mcp - Complete the OAuth flow with your Opti ID credentials
- Run: “List all of my content types” to verify the connection
- Read the official MCP server overview and configuration guide