📌 Scope: This post covers Optimizely CMS (SaaS) only, using the official content-js-sdk with Next.js 15 deployed to Vercel. This is a practitioner walkthrough — not official documentation.
⚠️ No official Vercel deployment guide exists for the content-js-sdk at the time of writing. This is what I figured out building my first app — Hello Opti World — from scratch.
I wanted to go from zero to a live Optimizely SaaS CMS site on Vercel using the official @optimizely/cms-sdk. The GitHub repo has great setup docs, but nothing on deploying to a hosted environment. This post fills that gap.
Step 1 — Your code on a Git repo
Vercel deploys from Git. Before anything else, push your Next.js app to GitHub, GitLab, or Bitbucket. For my Hello Opti World app I used GitHub.
Make sure your repo has an optimizely.config.mjs at the root — this is what the CLI uses to push content type definitions. Vercel doesn’t run the CLI for you; that’s a local step you do before deploying.
# Push your content type definitions to CMS before deploying
In Vercel, go to Add New → Project, connect your Git provider, and import your repo. Vercel auto-detects Next.js — no framework config needed.
Step 3 — Configure environment variables
This is the critical step. Before clicking Deploy, add all your Optimizely environment variables under Project Settings → Environment Variables. If you deploy without these the app will build but fail at runtime.
Set each variable for Production, Preview, and Development environments in Vercel. Don't leave them as Production-only or your preview deploys will break too.
Note : OPTIMIZELY_GRAPH_HOST is important when you have multi-site solution. SDK uses it to resolve your site from application configuration [See Step 4]
Step 4 — Configure your application
Make sure to configure your Vercel App URL/your URL as “Primary” for published version of your site.
Step 5 — Rebuild the Graph index
After pushing your content type definitions, always run a Graph Reindex before deploying. If the schema in Graph doesn’t match what your app queries, you’ll get empty results or runtime errors — not build errors, which makes it harder to catch.
Run the reindex job before deploying to keep Graph schema in sync
Step 6 — Deploy (and redeploy)
Trigger a deploy — either by pushing a commit or clicking Redeploy in the Vercel dashboard. The first deploy after adding environment variables often needs a manual redeploy because Vercel caches the previous build without the new vars.
After adding or changing any environment variable, always do a fresh redeploy — don’t assume Vercel picks them up automatically from the last build.
Show successful build output in Vercel dashboard
Error I ran into
Framework Preset silently resets to “Other” after changing Root Directory
This one took a while to track down — thanks to my colleague Sophia for helping troubleshoot.
When you create a Vercel project, you set the Framework Preset to Next.js. But if you later update the Root Directory (needed when your app lives in a subdirectory of the repo), Vercel silently resets the Framework Preset back to “Other” — and that’s what caused the build error.
Fix: Go to Project Settings → General → Framework Preset → set it back to Next.js → trigger a new deployment.
Website is live on Vercel! 🎉
Once it’s live, confirm content is flowing end-to-end: publish something in the CMS, check the update on head/vercel app!
If you work with Optimizely CMS SaaS across multiple clients, you know the anxiety — multiple tabs, multiple environments, and one wrong edit away from breaking a live site.
At Horizontal Digital, we manage several Optimizely CMS instances for different clients, each with production and test environments. The Optimizely UI looks identical across all of them. The only difference? A small label buried in the top nav: “hodi01saas: Production1” vs “hodi01saas: Test1”. Easy to miss when you’re moving fast.
So I built a Chrome extension to make it impossible to miss.
What It Does
The Optimizely CMS PROD Indicator extension does three things when it detects you’re on a Production1 environment:
Adds a bold red border around the entire browser viewport
Prefixes the browser tab title with [PROD – Client Name]
Shows a small “PROD” label in the left panel area
It works across all clients automatically — it reads the org name (e.g., “ClientA”, “ClientB”) directly from the CMS nav and includes it in the indicator so you always know which client’s production you’re in.
On Test1, Test2, or any non-production environment? Nothing shows up. Clean UI, no distractions.
How It Works
Optimizely CMS SaaS uses Web Components with shadow DOM for its navigation, which means standard document.querySelector calls can’t reach the nav labels. The extension recursively pierces nested shadow roots to find the environment label, checks if it contains "Production1", and only then injects the indicators.
It also watches for the components to hydrate (they load asynchronously) using a MutationObserver, so it works reliably on page load. No data is collected, no network requests — everything runs locally in the browser.
Install It
The extension is available on the Chrome Web Store — search for Optimizely CMS PROD Indicator or click here to install.
For fellow Optimizely developers and agency folks managing multiple client environments, I hope this saves you the same stress it saves our team. Drop a comment below if you have feedback or feature requests!
📌 Scope: This post covers Optimizely CMS (SaaS) only — using the @optimizely/cms-sdk toolchain. CMS 13 (PaaS) handles shared structure differently via .NET interfaces.
When you’re building a multi-content-type site, you quickly run into a problem: Blog Articles, Press Releases, and News Pages all need category and tags — but without a shared structure, you end up defining those fields three times and writing three separate Graph queries to retrieve them.
Contracts solve this. Define shared properties once on a Contract, apply it to any number of content types, and Optimizely Graph automatically exposes a unified query interface across all of them.
What is a Contract?
A Contract (also called an interface) defines a set of properties that any content type can implement. Once a content type implements a Contract, it’s guaranteed to have those fields — and Optimizely Graph automatically exposes a unified GraphQL interface for querying all implementing types in one call.
Why use Contracts?
Three concrete benefits:
1. Guaranteed consistency across content types. Define Category and Tags on a Categorizable contract. Apply it to Blog Article, Press Release, and News Page. Every one of those content types will always have those fields — editors can’t skip them, and developers don’t need to check for them per type.
2. One GraphQL query for all implementing types. Instead of writing three separate Graph queries and merging results client-side, you write one query targeting the Categorizable contract and get all content back in a single call. Inline fragments (... on BlogArticle) let you pull type-specific fields on top.
3. Front-end decoupling. Your React/Next.js components can be written against a contract interface rather than a specific content type. A <CategoryFilter /> component that works with any Categorizable content doesn’t need to know whether it’s rendering a blog post or a press release.
How: Define a Contract in code
The cleanest way is in your codebase using @optimizely/cms-sdk, then push it to CMS with the CLI. This keeps your contracts in version control alongside your content types.
Define the contract:
// src/contracts/Categorizable.ts
import{contentType}from'@optimizely/cms-sdk'
exportconstCategorizableContract=contentType({
key:'Categorizable',
baseType:'_component',// contracts use _component as their base
After pushing, run CMS → Settings → Scheduled Jobs → Graph Reindex to update the GraphQL schema. The Categorizable interface will appear as a queryable type in Graph within minutes.
How: Create a Contract in the CMS UI
If you prefer the no-code route: Settings → Content Types → Create New → Contract. Fill in the Name (programmatic key), Display Name, and Description, then add properties.
Once the contract exists, open any content type (e.g. Blog Article), go to its Contracts tab, and select the contract to implement it.
Note: Create the properties on the content type before applying the contract — the CMS binds existing properties to contract properties during assignment.
How: Query via Optimizely Graph
Once a contract is defined and content types implement it, Graph exposes the contract as a queryable type. Query all categorizable content with a single call, and use inline fragments for type-specific fields:
One query. Multiple content types. No client-side merging. This is the power of contracts over trying to union separate Graph queries in your front-end code.
Practical contract patterns
Contract name
Properties
Who implements it
Categorizable
category, tags
Blog, News, Press Release
SEOMetadata
metaTitle, metaDescription, canonicalUrl
All page types
Publishable
publishDate, expiryDate, author
Blog, Article, Event
HeroBlock
heroImage, heroHeadline, heroCTA
Landing Page, Campaign Page, Home Page
Note : A content type can extend multiple contracts by passing an array e.g. extends: [SEOContract, TrackingContract], // Multiple contracts. When a content type extends contracts: - Properties defined directly on the content type override any inherited properties with the same key - All contract properties are merged into the content type - If multiple contracts define the same property key, the rightmost contract wins
Gotchas
Properties must exist on the content type before you apply the contract. In Optimizely SaaS you define the properties on the content type first, then bind them to the contract. If you use the code-first SDK approach with the contracts array, this is handled automatically on push — no manual binding needed.
Always reindex Graph after changes. New contracts and updated implementations don’t appear in the GraphQL schema until you run a Graph Reindex job. In development this is easy to forget — build it into your CLI push workflow.
Set indexingType: 'queryable' on contract properties you’ll filter by. The default is searchable (full-text), which is fine for body text. But for fields like category or publishDate where you’re filtering/sorting — not full-text searching — use queryable for better Graph performance.
Quick checklist
☐ Contract defined with contentType() in code (or via CMS UI)
☐ Pushed to CMS with cms-cli config push
☐ Content types have contracts: [MyContract] (or assigned via UI)
☐ Graph Reindex run after push
☐ Contract properties use indexingType: 'queryable' for filter fields
☐ Front-end queries target the contract type, not individual content types
📌 Scope: This post covers Optimizely CMS (SaaS) only — using the official @optimizely/cms-sdk and @optimizely/cms-cli packages with Next.js 15. If you’re on Optimizely CMS 13 (PaaS/DXP), the caching architecture and tooling are different. See the DXP ISR docs for that path.
Your editor hit Publish. Five minutes later the page still shows the old headline. Sound familiar?
This is the most common pain point after go-live on Optimizely SaaS CMS. The content is correct in the CMS — but something between the CMS and the browser is holding onto an old version. This post explains exactly what that something is, why there are three independent caches involved, and how to wire up webhooks using the content-js-sdk so your site updates within seconds of every publish.
What is Optimizely Graph?
Optimizely Graph is the GraphQL delivery API that sits between your CMS content and your Next.js front end. Instead of calling the CMS APIs directly, your app queries Graph — a hosted, indexed, search-optimised GraphQL service at cg.optimizely.com/content/v2.
When an editor publishes content, the CMS syncs it into Graph’s index. Your front end queries Graph to get the latest version. Simple in theory — but each step has its own cache, and each cache can serve stale data if not managed correctly.
The three cache layers
Every browser request passes through three independent caches. Understanding each one is the key to avoiding stale content.
Layer 1 — Optimizely Graph cache
The first cache lives inside Optimizely Graph itself. It caches GraphQL query responses with a TTL that’s tied to your content’s StopPublish date — if content expires at a known time, Graph’s cache purges automatically. On publish events, Graph invalidates the relevant cached responses within seconds.
Important: Graph cache eviction has no timing guarantee. The @optimizely/cms-sdk's getClient() is smart about this — it does not use the cached Graph response when resolving paths inside a webhook handler. This is one reason to use the SDK rather than raw fetch for webhook path resolution.
Layer 2 — Next.js ISR cache
The second cache is your Next.js app’s own ISR (Incremental Static Regeneration) cache. When you set export const revalidate = 60 on a page, Next.js caches the rendered HTML and serves it for up to 60 seconds. You invalidate this cache with revalidatePath().
On Vercel, ISR cache invalidation propagates automatically across all serverless instances — no shared cache backend needed. This is one of the big advantages of deploying to Vercel for an Optimizely SaaS project.
Self-hosted / multi-pod only: If you run Next.js on your own infrastructure with multiple pods, the default filesystem ISR cache is per-instance. You'll need a Redis-backed custom cache handler so that revalidatePath() propagates across all pods. This is not needed for Vercel or Netlify deployments.
Layer 3 — CDN / edge cache
The third cache is your CDN. On Vercel, calling revalidatePath() automatically purges Vercel’s Edge Network cache for that path — no extra step required. If you use a separate CDN (Cloudflare, Fastly, AWS CloudFront), you’ll need to call its purge API explicitly after revalidation.
Fixing it: on-demand revalidation with content-js-sdk
Time-based ISR (revalidate: 60) is a fallback, not a solution. For content that should be live within seconds of publishing, you need on-demand revalidation triggered by Optimizely Graph webhooks. The content-js-sdk ships a working sample for exactly this.
Webhook event types
Event
When fired
What to do (SaaS CMS)
doc.updated
A content item is published
Resolve item’s URL path via SDK, call revalidatePath(path)
bulk.completed with deleted items
A sync job chunk included deletions
Call revalidatePath('/', 'layout') — no way to target specific deleted pages
bulk.completed without deletions
Routine sync job
No action needed — doc.updated handles individual publishes
Security: URL-based webhook ID
The content-js-sdk sample uses a clever security approach: the webhook URL itself contains a secret ID. Register the webhook at /webhooks/{WEBHOOK_ID} where WEBHOOK_ID is a long random string you generate. Anyone who doesn’t know the URL cannot trigger your revalidation endpoint. Set this in your environment:
# Generate a secure webhook ID (run once, save to env)
Create src/app/webhooks/[id]/route.ts. The handler validates the URL-based ID, then uses getClient() from @optimizely/cms-sdk to resolve the content path — no manual raw-fetch or Graph cache bypass needed:
Alternatively, auto-register the webhook on app startup using Next.js’s instrumentation.ts. The content-js-sdk repo has a full sample showing this pattern.
Enable ISR on your pages
Set a revalidation interval as a safety net — webhooks handle instant updates, but this ensures pages self-heal even if a webhook is missed:
// app/[...slug]/page.tsx
exportconstrevalidate=60// fallback: revalidate every 60s
exportconstdynamic='force-static'// ensure pages are cached after first render
OPTIMIZELY_GRAPH_SINGLE_KEY="" # Public read key — CMS → Settings → API Keys
OPTIMIZELY_GRAPH_APP_KEY="" # App key — for SDK client auth
OPTIMIZELY_GRAPH_SECRET="" # App secret
# Webhook security
WEBHOOK_ID="your-generated-uuid" # The secret segment in /webhooks/{WEBHOOK_ID}
Performance: avoid deep GraphQL nesting
Webhooks fix staleness — but a poorly modeled content tree makes every Graph query slow regardless. The biggest culprit is deep nesting.
When Graph serializes a response, it traverses every level of your content hierarchy. A query that goes Page → Section → Card → SubCard → Tag forces Graph to resolve 4+ joins per page. At scale this creates a serialization bottleneck — slow queries and slow ISR regeneration.
Anti-pattern
Problem
Fix
Content area embeds 10+ child items inline
Every child serialized on every page query
Use content references; fetch child content in separate queries
More than 3 levels of nesting
Exponential serialization cost
Flatten the model — make blocks independent types with reference fields
Recursive queries without depth limit
Can loop indefinitely, Graph timeout
Use @recursive directive with max depth, or fetch trees separately
The rule of thumb: max 2–3 levels of nesting. Design shared components (Hero, CTA, Card) as independent content types connected by content references — not inline content areas.
Monitoring and debugging
Graph playground
Test queries directly at: https://cg.optimizely.com/content/v2?auth={SINGLE_KEY}. Use it to verify content types are indexed after a CLI push, check schema structure, and measure query response time. Essential for diagnosing why a content type isn’t showing up.
Graph reindex after CLI push
Any time you push new or updated content type definitions with @optimizely/cms-cli, the Graph schema won’t update until you reindex: CMS → Settings → Scheduled Jobs → Graph Reindex. Without this, new fields won’t appear in GraphQL and your SDK queries will return empty results for new content types.
Check webhook delivery
Optimizely Graph does not retry failed webhooks indefinitely. Add console.log to your handler for every incoming request and every successful revalidation. On Vercel, the Functions tab shows real-time invocation logs — check for 404s (wrong WEBHOOK_ID) or 500s (handler errors).
Common issues and fixes
Symptom
Root cause
Fix
Page still stale after webhook fires
Webhook is hitting wrong URL or WEBHOOK_ID mismatch
Check Vercel function logs for 404; verify WEBHOOK_ID env var matches registered URL
Webhook not firing at all
Webhook not registered in CMS, or wrong URL
CMS → Settings → Webhooks — verify URL and that webhook is enabled
Content not in Graph after CLI push
Graph schema not reindexed
CMS → Settings → Scheduled Jobs → Graph Reindex
getClient() throws — missing config
SDK env vars not set
Ensure OPTIMIZELY_CMS_URL, OPTIMIZELY_GRAPH_SINGLE_KEY, OPTIMIZELY_GRAPH_APP_KEY, OPTIMIZELY_GRAPH_SECRET are all set
Deleted content page still reachable
bulk.completed without deleted check not doing full revalidation
Handle the deleted check inside bulk.completed as shown in the SDK sample
Stale content on non-Vercel CDN
CDN not purged after revalidatePath()
Call your CDN’s purge API (Cloudflare/Fastly) after revalidation — not needed on Vercel
Stale content checklist (SaaS CMS + Vercel)
☐ WEBHOOK_ID generated and set in Vercel environment variables
☐ Webhook handler at app/webhooks/[id]/route.ts using getClient() from @optimizely/cms-sdk
☐ doc.updated → revalidatePath(resolvedPath)
☐ bulk.completed with deleted items → revalidatePath('/', 'layout')
☐ Webhook registered in CMS Settings → Webhooks with correct URL
☐ export const revalidate = 60 set on pages as fallback
☐ Graph reindexed after every cms-cli push
☐ Content type nesting depth ≤ 3 levels
☐ (Self-hosted only) Redis cache handler configured for multi-pod ISR
☐ (Non-Vercel CDN only) CDN purge API wired up after revalidation
Optimizely quietly dropped something significant: a hosted Model Context Protocol (MCP) server for CMS (SaaS). This means your AI-powered editor — Cursor, Claude Code, VS Code Copilot, or Claude Desktop — can now talk directly to your Optimizely instance. No API scripts, no copy-pasting responses into prompts, no dashboard tab-switching.
You type a natural-language query in your IDE, and the MCP server fetches live data from your CMS and hands it back. That’s the pitch. Let’s dig into what it actually means in practice.
Quick primer: what is MCP?
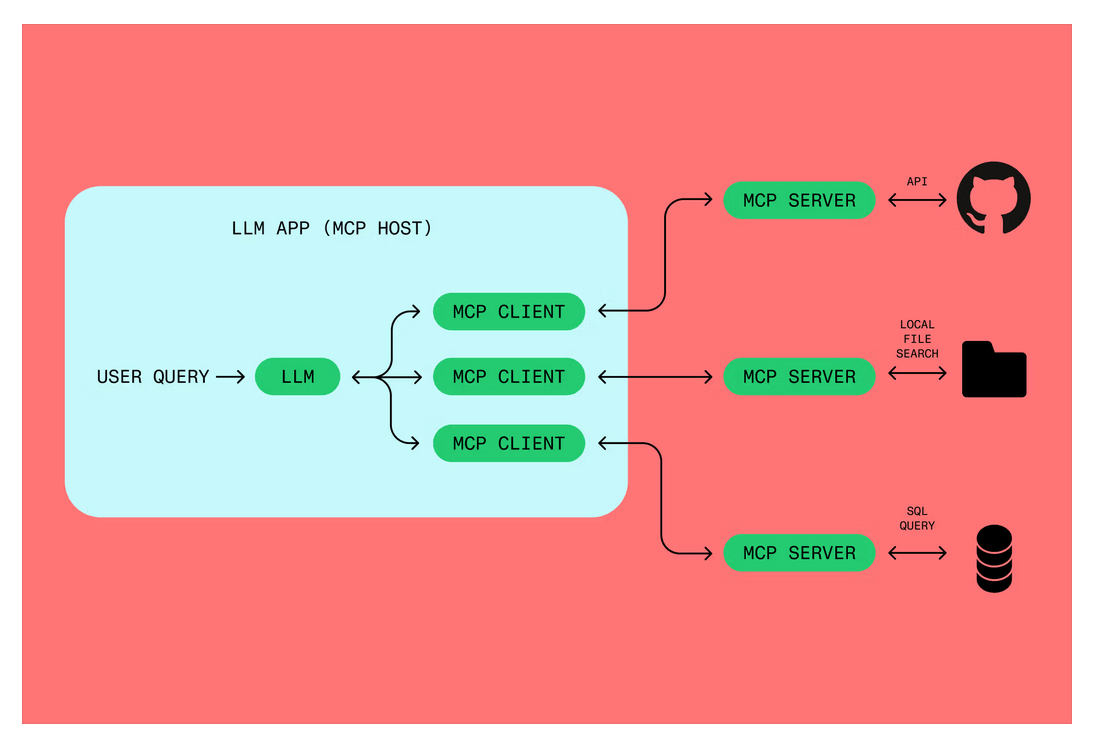
Model Context Protocol (MCP) is an open standard — originally developed by Anthropic — that gives AI clients a structured way to connect to external tools and data sources. Think of it as a universal adapter between your AI client and any system that implements the protocol.
Without MCP, you’re copying content into prompts or writing glue code to call APIs. With MCP, the AI client has a live, authenticated connection to the system and can call tools directly. The protocol handles the session, the tool schema discovery, and the data transport.
MCP is to AI clients what LSP (Language Server Protocol) was to code editors — a standard that removes the N×M integration problem.
Optimizely’s MCP server is hosted by Optimizely at a single URL. You register it once in your AI client and authenticate via OAuth. No self-hosting, no token management.
Once connected, the MCP server exposes a set of tools prefixed with cms_ and graph_. Here’s what you can actually do from inside your editor:
Use case
Example prompt in your IDE
Content type auditing
“What are all the content types updated in the last year?”
Content creation
“Create a Hero block content type with these fields…”
Front-end scaffolding
“Generate a React component for the BlogPost content type”
Developer onboarding
“Complete the initial dev setup for this CMS instance”
Preview configuration
“Configure preview for my Next.js app running on localhost:3000”
Content migration
“List all content items using the deprecated LegacyHero type”
The server sees exactly what your Opti ID account has access to — same data, same permissions as the Optimizely UI.
Who it’s for
Developers using AI-powered editors
If you’re working in Cursor, Claude Code, VS Code with Copilot, Windsurf, or Codex, the MCP server lets you complete full implementation workflows without leaving your editor. Define a content type, scaffold the React component, and configure preview — all in one agentic session.
Technical marketers and editors in browser-based AI
If you use Claude Desktop, Claude.ai, or ChatGPT, you can query your CMS instance in plain English for reporting and auditing. No developer needed to pull a content inventory or check what’s been updated.
How to set it up (5 minutes)
The MCP server URL is:
https://cms.mcp.opal.optimizely.com/mcp
Prerequisites
An Opti ID account (same credentials you use to log into the Optimizely UI)
An Optimizely account with Opal enabled, connected to at least one CMS (SaaS) instance
An AI client that supports remote MCP (see table below)
Register the server in your AI client
AI Client
How to add
Claude Code (CLI)
claude mcp add --transport http cms https://cms.mcp.opal.optimizely.com/mcp
Claude Desktop
Settings → MCP Servers → Add Server
Claude.ai
Settings → Integrations → Add MCP Server
Cursor
Settings → MCP → Add new MCP server
VS Code + Copilot
Open MCP settings in Copilot configuration
Windsurf
Settings → MCP Servers, or edit .windsurf/mcp.json
Codex
Settings → MCP servers → Add server
Authenticate
On first connection, your AI client opens a browser OAuth flow. You:
Log in with your Opti ID credentials
Select your Opal instance
Authorize the MCP connection
That’s it. No manual API token, no credential files. The session is time-limited — when it expires, your client prompts you to re-authenticate.
Test the connection
Run this query in your AI client:
List all of my content types
You should get a real-data response from your CMS instance. If you see tools prefixed with cms_ or graph_ in your client’s tool list, you’re connected.
Demo: see it in action
The walkthrough below shows connecting the MCP server in Cursor, authenticated with Opti ID, and running a live content type query against a real CMS (SaaS) instance.
It’s worth understanding the three-layer identity model:
Opti ID — Optimizely’s unified identity system. Single credentials across all Optimizely products. If you have an Optimizely login, you already have Opti ID.
Opal — Optimizely’s agent orchestration platform. The MCP server authenticates through your Opal instance, which in turn is connected to one or more CMS (SaaS) instances. Selecting your Opal instance during OAuth automatically wires up all the CMS instances linked to it.
MCP session — Once authenticated, your AI client holds a time-limited OAuth token. The MCP server uses this to call Optimizely APIs on your behalf, with exactly the same permissions your account has in the UI.
No service account, no static API key sitting in a .env file. That’s a meaningful security improvement over how most CMS integrations work today.
Using it with the JavaScript SDK Skills
The MCP server is designed to work alongside the Optimizely JS SDK skills — a set of agentic skill definitions for the JS SDK. Together, they unlock a more complete development workflow:
MCP server provides live read/write access to your CMS instance
SDK skills provide the recipe for common tasks (scaffolding, preview config, content type creation)
For example: you can ask your AI client to “Create a Hero content type and scaffold a React component for it” — the MCP server handles the CMS API calls, the SDK skill handles the component code generation.
Things to be aware of
A few practical notes before you start:
Opal must be enabled on your account. The MCP server authenticates through Opal, so if Opal isn’t connected to your CMS instance, the auth flow will fail. Check with your Optimizely account admin.
Session expiry — OAuth sessions are time-limited. When your session expires, your AI client will prompt for re-auth. Plan for this in long-running agentic workflows.
Permissions are inherited — the MCP server respects your Opti ID RBAC. A read-only editor won’t be able to create content types via MCP even if they try.
Remote MCP support varies by client — most modern AI editors support it, but double-check your client version. Older versions of Cursor or VS Code Copilot may need an update.
Why this matters for Optimizely SaaS projects
The MCP server isn’t a gimmick — it directly addresses some of the friction points we see on every Optimizely SaaS implementation:
Content type auditing is tedious in the UI. With MCP, it’s a single natural-language query.
Front-end scaffolding from content types usually means copying field definitions by hand. Now your AI client can read the content type directly and generate the component.
Onboarding new developers takes time because they need to learn the CMS UI to understand the content model. MCP lets them ask the system directly.
Migration planning — finding all content using a deprecated type, or auditing what’s changed — becomes a conversation rather than a dashboard report.
Get started
Check that Opal is enabled on your Optimizely account
Open your AI client and register the MCP server: https://cms.mcp.opal.optimizely.com/mcp
Complete the OAuth flow with your Opti ID credentials
Run: “List all of my content types” to verify the connection
A couple of weeks ago I had the chance to spend a day at the Optimizely Opal Partner Enablement Workshop hosted at the Horizontal Minneapolis office. It was a hands-on session focused on getting partners up to speed on Opal — Optimizely’s AI orchestration layer — and walking through the building blocks you actually compose when you build an Opal agent.
This post is my attempt to distill the basics into something I can come back to (and that maybe helps you, too, if you’re just starting out). If you want the marketing-level pitch first, the official landing page is here:https://www.optimizely.com/ai
At its core, Opal is built on four primitives: Instructions, Tools, Specialized Agents, and Workflows. Once those four clicked for me, everything else in the platform started to feel a lot less mysterious. Let’s walk through each one.
Instructions [Recently updated to Context]
Short explanation: Instructions are the natural-language guardrails that shape how an Opal agent thinks and responds. They are the agent’s job description — its role, its tone of voice, what it should and shouldn’t do, how it should handle edge cases. If you have ever written a “system prompt” for an LLM, you already know the shape of this. The difference in Opal is that instructions become a reusable, versioned asset that any agent or workflow can pull in.
One example: A “Brand Voice” instruction set that tells the agent to write in second person, keep sentences under 20 words, avoid corporate jargon, and always end on a clear call to action. Drop those instructions into a content-writing agent and every draft it produces starts from the same baseline — no more re-explaining the brief.
This is a Create Skill UI – I believe all fields are self explanatory and contextual help is also available
Tools
Short explanation: Tools are the things an Opal agent can actually do in the outside world. A tool is a callable function — usually exposed over an API — that the agent can invoke when it decides it needs to fetch data, take an action, or hand work off to another system. Without tools, an agent is a very articulate text generator. With tools, it becomes something that can publish a page, run a query, or trigger an experiment.
One example: A simple get_cms_content tool that takes a content ID and returns the latest draft from Optimizely CMS. The agent doesn’t need to know how the CMS works — it just needs to know that this tool exists, what it accepts, and what it returns. That separation between “reasoning” (the agent) and “doing” (the tool) is what makes the model practical to build on.
You can write these tools in either of these languages:
Short explanation: A Specialized Agent is what you get when you combine a focused set of instructions with a curated set of tools and aim it at one specific job. Instead of a single do-everything assistant, you build narrow agents that are very good at one thing — SEO review, A/B test ideation, product copywriting, content tagging — and then compose them. Narrow agents are easier to reason about, easier to test, and easier to trust in production.
One example: An “SEO Reviewer” agent whose only job is to read a draft article and return three things — a recommended meta title, a meta description under 155 characters, and a list of missing keywords based on the target topic. It has instructions about how to think like an SEO analyst, and a small tool for pulling keyword data. That’s it. No content generation, no publishing — just review.
Short explanation: Workflows are how you stitch the pieces together. A workflow chains agents, tools, and decisions into a multi-step process — pass the output of one agent into the next, branch based on a result, loop until a condition is met. This is where Opal stops feeling like “a chatbot with extras” and starts feeling like an orchestration platform. The agents stay small and focused; the workflow is where the choreography lives.
One example: A “Blog Post Pipeline” workflow that takes a topic brief, hands it to a Writer agent, passes the draft to the SEO Reviewer agent above, calls a CMS tool to create a draft entry, and then notifies the editor in Slack. Each step is independently swappable — you can upgrade the writer, replace the SEO reviewer, or change where the final draft lands without rewriting the whole thing.
To put all four primitives in one place, here is the small example I’ve been sketching out since the workshop — a “Web Accessibility Validator Agent which sends report via email”:
It’s a small example on purpose. Once those four primitives clicked, the temptation was to design something enormous on day one — but the thing the workshop kept pushing was to start narrow, get one workflow working end-to-end, and then grow from there.
Wrapping up
If you remember nothing else from this post, remember this: Instructions/Context shape behavior, Tools enable action, Specialized Agents combine the two for a specific job, and Workflows orchestrate the whole thing. Almost everything you’ll build on Opal is some arrangement of those four pieces.
Huge thanks to the Optimizely and Horizontal teams who put the Minneapolis partner enablement workshop together.